This effect is very versatile when created non-destructively, but it's also rather complicated to do. Try the destructive G'MIC version if you just need a quick effect.
Theory
Before we actually create the effect, let's understand what we need to do to accomplish it.
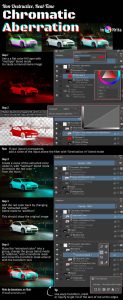
Chromatic aberrations occur when light is refracted through a glass lens. Color is different wavelengths of light, and the the material of the lens will refract different wavelengths differently. This means that for the camera, it's as if one color was photographed at one distance, while the other color was photographed at a different distance.
When two objects are at different distances, they will appear at different positions when projected on a 2D plane, like a photograph. In this case, it's not two objects, it's the same object, but the colors are photographed as if they were at different distances from the camera. This is why the color appears to "shift."

Observe that chromatic aberration creates a fringe on two sides. If there is a red fringe on one side, there will be a blue fringe on the opposite side. The reason why this happens is that the red color has shifted toward one direction through the whole image.
The amount of red didn't change. It just moved.
White is the combination of all light colors. When red shifts away from white, the white becomes cyan (blue).
For our effect, what this means is that we'll need to move the red color, and only the red color, a few pixels to one side or another.
Unfortunately, there is no filter built into Krita to do this, so we'll need to do something a bit different that has the exact same effect.
Instead of "moving" the color red, we're going to take all the red color of the image and remove it from the image, and then add a copy of that red to the image at a different position. By doing this, it will work as if we had effectively moved the red. To recap, the steps will be, literally in this order:
- Take the red.
- Remove it from the image.
- Add a copy of the red to the image.
- Move the copy to a different position.
We'll see that our layers will very closely resemble the steps above. This is what we'll end up with:
Group: "Chromatic Aberration"
Pass Through: Yes
│
├─ Group: "1st Color"
│  Pass Through: Yes
│  │
│  ├─ Group: "Shifted"
│  │  Blend Mode: Addition
│  │  │
│  │  ├─ Transform Mask
│  │  │  Move this to one side.
│  │  │
│  │  ├─ Optional: Motion Blur
│  │  │
│  │  └─ Group: "Extracted Color"
│  │     │
│  │     ├─ Filter Layer
│  │     │  Filter: Cross-channel color adjustment
│  │     │  Lightness to alpha (linear slope)
│  │     │
│  │     ├─ Fill Layer
│  │     │  Solid red color
│  │     │  Blend mode: Multiply
│  │     │
│  │     └─ Clone of "Proxy"
│  │
│  └─ Clone of "Extracted Color"
│     Blend mode: Subtract
│
├─ Group: "2nd Color"
│  Same thing as 1st,
│  but with a different color
│  and transform position.
│
└─ "Proxy" (Clone of "Input")
    Visibility: Hidden

Group: "Input"
Your work goes inside this group.
Setting up a Proxy
This is an optional step, but it's a good idea to understand it.
1: if you have an illustration or photo edit with multiple layers, make sure the whole illustration is inside a single group. Let's call it "Input."
Group: "Input"
├─ Line Art...
├─ Color...
└─ Background...
2: create a separate group above "Input" called "Chromatic Aberration."
Group: "Chromatic Aberration"
Group: "Input"
3: on the "Layers" docker, click on the rightmost icon on the "Chromatic Aberration" group to make it pass through. The icon looks like a brick, and becomes a brick wall with an arrow when pass through is enabled. Alternatively, right click on the layer and go to Properties... in its context menu (keyboard shortcut: F2) to enable the pass through mode there.
4: with "Input" selected, click on "Add Clone Layer" to create a clone layer from it. Name the clone layer "Proxy."

Add Clone Layer" can be found.5: move "Proxy" to inside "Chromatic Aberration" and click on the eye icon to make it invisible.
Group: "Chromatic Aberration"
Pass Through: Yes
│
└─ "Proxy" (Clone of "Input")
    Visibility: Hidden

Group: "Input"
With this set up, we will be able to easily show and hide the "Chromatic Aberration" group by hiding the group, and we won't need to refer to the "Input" group any more, so it will be easy to copy and paste the whole "Chromatic Aberration" group to another document.
Single Color
1: create a group called "1st Color" and place it inside the "Chromatic Aberration" group.
2: make "1st Color" pass through.
Everything we'll do from now on will be placed inside this group.
Group: "Chromatic Aberration"
Pass Through: Yes
│
├─ Group: "1st Color"
│  Pass Through: Yes
│
└─ "Proxy"
Extracting the Red
The first thing that we're going to do is extract the red color from our input. Although we're doing it with red, you will be able to change it to any color you want and it should without any trouble.
1: optional: hide the "Input" layer so that you can better understand what each step does. Assuming that you only have "Input" and "Chromatic Aberration" in the document, the whole canvas should be transparent after you hide it.
2: create a clone of "Proxy" and place it into the "1st Color" group. You should be seeing the same thing you would see if "Input" was visible, because the only layer visible is a clone of "Proxy" which is a clone of "Input."
3: click on "Add Fill Layer" (it's on the same menu we used to add clone layers). A dialog box should appear that lets you select the color for the fill layer.
4: select the color red (255, 0, 0). Its color code is #ff0000. Click OK to add the fill layer. The whole canvas should be red now.
5: change the blend mode of the fill layer to "Multiply." You should see that the canvas becomes a monochrome image from black to red.
6: create a filter layer above the fill layer. The filter we want is Adjust -> Cross-channel color adjustment. In its settings, you should see a dropdown list button for Channel and Driver Channel, and a curve editor.
7: set Channel to Alpha and Driver Channel to Lightness.
8: move the left point on the curve editor to the bottom-left, and the right point to the top-right, i.e. make a diagonal slope from bottom-left to top-right. Then click OK. This filter will make the black parts of the image transparent, and make the fully saturated parts opaque.
9: place all 3 layers in a group called "Extracted Color" inside "1st Color."
Warning: if your input has transparent pixels, the result may look wrong because the fill layer may make the transparent pixels become opaque red. To fix this, create another clone of "Proxy" and add it above the filter layer with the blend mode "Destination In." This blend mode will work like a clipping mask.
Group: "1st Color"
│
└─ Group: "Extracted Color"
   │
   ├─ Optional: 2nd Clone of Proxy
   │  Blend mode: Destination In
   │
   ├─ Filter Layer
   │  Filter: Cross-channel color adjustment
   │  Lightness to alpha (linear slope)
   │
   ├─ Fill Layer
   │  Solid red color
   │  Blend mode: Multiply
   │
   └─ Clone of "Proxy"
Removing the Red
Next we're going to use remove the color we extracted from the input.
1: make the "Extracted Color" invisible, and the "Input" visible again. Since only "Input" is visible now, that's all you should see.
2: create a clone of "Extracted Color" and place it below "Extracted Color," inside the "1st Color" group.
3: change the blend mode of the clone to "Arithmetic -> Subtract."
What this blend mode does is simply subtract the RGB values of this layer from the composited image below. For example, if a pixel on this layer is red (255, 0, 0), and a pixel below is gray (127, 127, 127), the result is dark cyan (0, 127, 127). Note that we can't go into negative numbers with this.
Since this is a clone of the extracted red color and now we're subtracting it from "Input," the composited canvas should be an image that has no red color in it at all. Anything that is white (255, 255, 255) in the "Input" should become cyan (0, 255, 255).
Group: "1st Color"
│
├─ Group: "Extracted Color"
│
└─ Clone of "Extracted Color"
   Blend mode: Subtract
Adding the Red Again
Now that we removed the red from the image, we need to add it again to the image it again, this time separated from the input.
1: make the "Extracted Color" visible again. The canvas should become covered in red.
2: change the blend mode of "Extracted Color" to "Arithmetic -> Addition." Addition is the opposite of subtraction, so this literally just does what we did above but in reverse. You should see the exact image of the "Input" right now. That's right, all of the steps so far amounted to changing nothing in the image at all!
Group: "1st Color"
│
├─ Group: "Extracted Color"
│  Blend mode: Addition
│
└─ Clone of "Extracted Color"
   Blend mode: Subtract
Shifting the Red
Finally we`ve reached the last part: moving the red around. To do this, follow the following steps:
1: create a new group inside the "1st Color" group, call it "Shifted."
2: place "Extracted Color" inside "Shifted."
3: because we placed inside "Extracted Color" inside "Shifted," and it's the only layer in that group, its "Addition" blend mode became useless, and we're currently blending in "Normal" mode because that's the blend mode of "Shifted." Change the blend mode of "Shifted" to "Addition" to fix that.
4:: with the "Shifted" group selected, add a transform mask. Transform masks are added through the same menu we used to add other layer types.
5: select the transform mask.
6: select the transform tool in the toolbox.
7: click on the canvas, then move the transform mask around.
You should see that only the "red" color of the image moves around. You can zoom-in to align it with more ease.
Tip: you can use the arrow keys to translate (move) while the transform tool is active.
Note: you may be wondering why it's necessary to create a separate layer group for the transform mask, instead of just adding it to the "Extracted Color" group. That's because if we used a transform mask in the "Extracted Color" group, then the clone we created from the "Extracted Color" group would clone the transformation as well. We need the clone to stay in the original position of the "Extracted Color," subtracting the red, while we move the red away, so the transform mask had to be placed somewhere else.
Group: "1st Color"
│
├─ Group: "Shifted"
│  Blend mode: Addition
│  │
│  ├─ Transform Mask
│  │
│  └─ Group: "Extracted Color"
│
└─ Clone of "Extracted Color"
   Blend mode: Subtract
If you followed the steps correctly, you should have created a chromatic aberration effect that is simple enough that Krita can render it in real time. Of course this depends on how large your image is, and on how fast your hardware is. You can easily toggle it on and off by hiding the Chromatic Aberration layer group.
Tip: if you use the transform mask just to move (translate) the shifted color to one side, it's fast, but it will create "gaps" on the edges of the image where there is no red color, because you moved it away without adding anything in its place. There are a few ways to solve this. The simplest way is to just crop the image so that you can't see the edges. You could also try creating a clone of Shifted to use as clipping mask for the subtract layer, but this might look weird, too. A third method is to use warp transform, mesh transform, or liquify instead of the default transform method in the transform mask. These can be accessed in the tool options of the transform tool. Note that these other methods can solve the edge issue, but they're much slower to process, so you won't be able to work with them in real time. A workaround for that is to create two transform masks, one with the default method for previewing purposes, and one with the slower method for publishing purposes, and switch which one is visible as you need it.

Bonus: Blurry Aberrations
Chromatic aberration in real life is rather blurry, while the "glitchy" effect that people normally used is very sharp. You can make your chromatic aberrations blurrier in Krita by adding a motion blur filter to a color, or by creating a second color to shift.
1: select the 1st Color group and click the duplicate button. Name the duplicate "2nd Color."
2: change the color of the fill layer in the "2nd Color" to green.
3: using the transform tool on the transform mask of the "2nd Color," shift the "2nd Color" to the space between its original position and the position where the "1st Color" is. This should create a gradient effect.
For example, where red (255, 0, 0) and green (0, 255, 0) overlap, you will get yellow (255, 255, 0), because of the layers in "Addition" blend mode.
Leave a Reply